Showing posts with label using. Show all posts
Showing posts with label using. Show all posts
Sunday, May 28, 2017
Man In The Middle Attack Using Ettercap In Kali Linux
Man In The Middle Attack Using Ettercap In Kali Linux

It’s one of the simplest but also most essential steps to “Conquering” a network. Once a hacker has performed a “Man In The Middle” attack (MITM) on a local network, he is able to perform a number of other “Side-kick” attacks. This includes: cutting a victim’s internet connection; intercepting Emails, logins, and chat messages; and many others. here we are using one of the best tool Ettercap.
Ettercap
Ettercap has a huge following and is widely used by cybersecurity professionals. Ettercap works by placing the users network interface into promiscuous mode and by ARP poisoning the target machines, i.e. facilitating a Main In The Middle or MITM attack. Once successfull Ettercap (and the hacker) can deploy various attacks on the victims. A popular feature about Ettercap is its ability to support various plugins.
And only one tool is needed for this attack:
- An install or Live boot of Kali Linux, a well-known OS containing a collection of hundreds of penetration testing tools - Click here to install Kali linux
If you have that, then proceed to the tutorial below, and we’ll demonstrate how to perform this powerful attack.
Note: This tutorial is intended to be used for penetration testing, i.e. the act of hacking to become more secure. It is not at all meant for malicious purposes. Performing any type of fraudulent activity on someone else’s network without permission is considered a crime in most countries. PicaTesHackZ is using their own test network in this demonstration.
Step One:
Start Kali Linux and login to the root user.
Step Two:
Open a Terminal and type: leafpad /etc/ettercap/etter.conf

Step Three:
Look through the text file that just opened. On one of the first lines, under the [privs] section, look for the words highlighted below:

You need to change these lines to this:

By removing the number 65534 and replacing it with 0 (zero). You can leave the “# nobody is default” line.
Step Four:
This next one will be tricky to locate, so we’re going to use the “Find” option. Click onSearch in the toolbar at the top of leafpad and click Find.Type the word iptables in the box that appears and click the Find button or press Enter.

It should skip to a line that looks like this:

We need to “uncomment” the two bottom lines. To do this, remove the two “#” symbols before each “redir_command,” so that the two lines look like this:

Now close leafpad and click Yes when it asks you to save changes.
Step Five:
Now start Ettercap-gtk, open a Terminal and type ettercap –G

Wait until Ettercap opens. When it does, click Sniff in the toolbar and select Unified Sniffing… from the menu.

Step Six:
Select the interface that’s connected to the network.

If your using a wired (ethernet) connection, then the interface will probably be eth0, but if you’re using wireless, (WLAN), then it will be a different one. To find which one of your interfaces is connected, run ifconfig.
Step Seven:
Now Ettercap should load into attack mode. Click on Hosts and select Scan for hostsfrom the menu.

Step Eight:
Ettercap will briefly scan for hosts on the network. After a moment, you should see the words “hosts added to the host list…” in the command box. This is the green light.
Click on Hosts again, and this time select Hosts list from the menu.

Step Nine:
Click the IP address of the router and click the Add to Target 1 button.

Then select the IP of your test victim’s machine and click Add to Target 2.

Step 10:
Now click Mitm on the toolbar and select Arp poisoning…

When the question box shows up, check the box next to Sniff remote connections and hit OK.

Step 11:
Ettercap will now Arp poison the victim and router. Now if you want to see any of the victim’s personal info, you’ll need to click Start on the toolbar and select Start sniffing.

Available link for download
Read more »

Saturday, April 22, 2017
LSG Webinar Using live online training as part of a successful learning blend
LSG Webinar Using live online training as part of a successful learning blend
Its been a while since Ive reported a webinar, so today with the new series of Learning and Skills Group sessions, Im getting back on the live-blogging circuit. Ok, kinda. Anyways, todays topic is (as you may have guessed) "Using live online training as part of a successful learning blend.". Charles Gould of Brightwave and Matt Turner of Live Time are going to be trying to answer the question that most people seem to be asking of synchronous learning. So, as most LSG webinars, I think this promises to be an interesting event. Lets get started.
Charles and Matt seem to have discovered a huge demand for synchronous learning in the course of their consulting work in the elearning space. So lets see whos attending this webinar:
- 17% Trainers
- 11% Learning Designers
- 20% L&D Manager
- 19% E-learning Professional
- 17% Other
So what is the difference between a webinar and a live online training course?
There are some subtle differences and here are some of them:
- Online training sessions are a bit more formal and have some well defined outcomes.
- They tend to be more action-oriented in their approach
- They have objectives and motivations which are consistent across the trainers and the students.

Online training is starting to be a good supplement to classroom and elearning activities. The benefits are quite obvious - costs, the lower carbon footprint, the ability to actually do it without any huge constraints. We need to look beyond just those benefits though - we can have lots of people in the training, we can all talk together, we can walk out without offending people and most importantly, its an nice way to bring geographical diversity to your classroom. So its a little more than just a virtual classroom.
That said, theres no opportunity for body language, eye-contact and then again theres a myriad of distractions available to us -- for example Im live blogging at this moment.
It looks like everyones been involved with online training in some way or the other. So lets hear some of Matt and Charles tips for online training.
Technology
As you may already know, there are several options for online training tools. Theres DimDim, Live Meeting, Webex, GoToMeeting, Lotus Live Meetings, Cisco Webex and Adobe Connect. If youre still deciding, here are a few things to consider:
- Bandwidth - does your organisation have enough bandwidth on the network to run this kind of thing?
- Storage - where will you save most of your data, recordings, etc?
- Risk - how secure is the service and how open or closed is the option youre using?
- Integration - are you using it with your LMS or other systems?
- Costs - how cheap or costly is your implementation going to be? How much staff time are you going to need?
People, as weve already discussed have a myriad of distractions in their life. People are people and if they want to multi-task, they will! When you dont get eye-contact, its a gigantic difference. If youre multi-tasking then youre perhaps going to be a good online training thats because you already know what your audience will do.
So, what you dont want is someone reading a script. What you dont want is someone reading script. What you do want is someone bringing in a bit of a personality. Voice is crucial to the success of an online training session. Using a headset helps and perhaps a directional mike maybe? Trainers need to be hugely expressive online - remember people cant see you; so make peace with that and do what you can to overcome that hurdle. As human as you can sound, the better for you!
Content
So lets see what kind of subjects work well in this medium.Ive now completely lost visuals- damn! So Ill just go with what I hear.
Seems like soft skills are a good area to discuss online. Bringing in experts and to keep it short and simple is a good idea as well. Learning from suggestions that others make is a great way to influence behaviour. The more you can involve people, the better - 90% of the talking should be from the participants. Teach people how to use the tool and how to use the chat box. Just as Don does for the LSG webinars, it does helps a lot to get people used to the environment. This is the equivalent of getting people used to a training environment. Also, get peoples views by using polls as an activity. This is the equivalent of how we do polls (show of hands) in a classroom.
Dont overdo the poll though, but beware the meaningless poll - they can break up the momentum of the session. So use polls where you expect a distinct set of answers, but if things are just obvious, dont just do it for the sake of doing it.
Final Tips
- Ask people what theyll commit to do once theyve been through the session.
- Whats going to stop them from doing what theyd like to do.
- Discuss these hopes and concerns with participants.
- Dont be ambitious - its not about what you want to do to look cool. Its also about managing change and getting people comfortable with the medium.
- Roland from Live Time has a tip - the technology is there, but dont go overboard!
- The voice of just one person gets boring after a while, so vary it by bringing in audio, video, etc.
- Dont get flustered if things go wrong - remembers Murphys law.
- Be flexible - something that works in one session, will not necessarily work in the next. The dynamics of people are extremely crucial to keep in mind.
- Online training takes time. To make something, simple, short without the benefit of physical presence and the interactivity that people expect, is always tough. So try getting as much of this work done up front and make sure you prepare well!
Available link for download
Friday, April 21, 2017
Make Professional Intro Video using Sony Vegas
Make Professional Intro Video using Sony Vegas
Today Im going to tell you how to create a beautiful Intro Video using Sony Vegas. Intro video helps you to growing your business and helps you to make professionally like a brand. By some professional intro videos you can increase your subscriber and also viewers on your Blog or Web or on your YouTube Channel. Intro Videos make your business cool and attractive. You will have to do just some simple steps.

Related:
Also Visit:
Steps to Create Intro Videos:
1. First of all you have to Download and Install Sony Vegas Software.
2. Now Download different Sony Vegas format "Templates" below one by one.

SV Intro-1 SV Intro-2
SV Intro-3 SV Intro-4
SV Intro-5 SV Intro-6
3. Extract all winRAR folders and open Sony Vegas file.
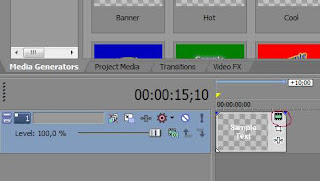
4. This file will open in Sony Vegas Software. Now you have to edit all "Generated Media" with your Text. (See below Picture)
5. Now "Render" the Template. And select the "Video Quality" like format.
6. And Its Done! :)
If you like this Post then you need to Share this post with your Friends on Social Media Sites, also dont forget to share your thoughts in comment section.
Available link for download
Wednesday, April 19, 2017
Making Related List without using Apex Class
Making Related List without using Apex Class
Hi All,
Here i want to give some sample code to show you how to make RelatedList on your VF page without using any Apex Code. There are two solutions for this problem.
1) Using <apex:relatedlist>
Suppose you have standard Case object and have one custom child object named "Child__c" to case. Then you can show your relatedlist on vf page using below code.
<apex:page standardController="Case">
<apex:relatedList list="Childs__r"/>
</apex:page>
The list will be displayed on your page but it always gives "Action" column also with "Edit | Del" links. If you want to get rid off that then you need to do a little jquery trick to remove that. See the below code.
<apex:page standardController="Case">
<script src="https://ajax.googleapis.com/ajax/libs/jquery/1.4.3/jquery.min.js"></script>

<script>
$(document).ready(function(){
$(#Childs a).attr(target,_blank);
});
</script>

<style>
.pbButton{
display:none;
}
.actionColumn{
display:none;
}
</style>

<Div id="Childs">
<apex:relatedList list="Childs__r"/>
</Div>

</apex:page>
The main issue i found using above approach of making list is that it depends on fields selected on page layout for that relatedlist. If you have added 2 fields on your layout, your vf will also show two fields. If you remove that related list from layout, then your vf will show only default fields ( name) only. So, in some sitations this solution is not perfect. For that reason, here is another solution.
3) Using relations objects iteration and Standard Tags.
Here is the other way to achieve your related list on vf page:
<apex:page standardController="Case">
<apex:sectionHeader title="http://www.aslambari.com" subtitle="Related List Example"/>
<apex:pageBlock>
<apex:pageBlockTable value="{!Case.Childs__r}" var="child">
 <apex:column headervalue="Name"><apex:outputLink value="/{!child.id}">{!child.name}</apex:outputLink></apex:column>
 <apex:column value="{!child.detail__c}"/>
 <apex:column value="{!child.is_active__c}"/>
 <apex:column value="{!child.createddate}"/>
 <apex:column value="{!child.createdbyId}"/>
</apex:pageBlockTable>
</apex:pageBlock>
</apex:page>
http://labsprojects-developer-edition.ap1.force.com/apex/RelatedListSample?id=50090000000sW5q
The above way, you can customize your list as you want.
Hope It helps developers to find quick solution for related list.
Thanks
Aslam Bari
Available link for download
Thursday, March 30, 2017
Malwarebytes Anti Malware Premium 3 0 4 1269 FINAL Cracked Activation using Internet ! Latest
Malwarebytes Anti Malware Premium 3 0 4 1269 FINAL Cracked Activation using Internet ! Latest
Malwarebytes Anti-Malware
!! Premium 3.0.4.1269 !!
FINAL Cracked Activation using Internet ! [Latest]

Malwarebytes Anti-Malware is an anti-malware application that can thoroughly remove even the most advanced malware. Malwarebytes products have a proven record of protecting computers by completely removing all forms of malware, including viruses, Trojans, spyware, adware and rootkits. When it comes to the safety of your computer, Malwarebytes provides the ultimate in protection from the cutting edge of technology! Malwarebytes technology takes the next step in the fight against malware. Malwarebytes Anti-Malware PRO detects and removes malware where even the best known anti-virus and anti-malware applications fail. Malwarebytes Anti-Malware PRO monitors every process and stops malicious processes before they even start.
Features
- Flash – Lightning fast scan speeds
- Thorough – Full scans for all drives
- Works Well With Others – Cooperative functionality
- Puts YOU first! – Priority database updates
- Puts Malware in the Slammer – Quarantine function holds threats and lets you restore at your convenience
- Talk to the hand – Ignore list for both the scanner and Protection Module
- For Your Pleasure – Customizable settings enhance performance
- Lock It Down – Password protect key program settings
- Chameleon – Gets Malwarebytes running when blocked
- Toolbox – Extra utilities to help remove malware manually
- Nitty Gritty – Command line support for quick scanning
- RPP, Yeah You Know Me – Realtime Proactive Protection Module
- Hablamos Everything! – Multi-lingual support (Klingon still in beta)

1. If you have a previous version activated to Premium using any keygen, remove it completely, particulary make sure you totally delete the following path:
"C:ProgramDataMalwarebytesMalwarebytes Anti-MalwareConfiguration" (without quotes)
[Delete this folder! Also make sure to clean registry leftovers. Afterwards reboot.]
(OR)
Uninstall using the "Geek uninstaller" or "Malwarebytes Unistaller" provided.
2. Enable internet connection, this workaround will work in online environment.
3. Edit the hosts using notepad as adminstrator:
In notepad, open the following path:
"C:WindowsSystem32Driversetchosts" (without quotes)
hosts file opens edit ip or add ip and domain as below to already existing sets of hosts:
"0.0.0.0 keystone.mwbsys.com" (without quotes)
Save the hosts.
4. Then install older version setup "Malwarebytes v2.2.1.1043 Setup".
5. After installation is done, dont launch it.
6. Copy the License file () in the following path:
"C:ProgramDataMalwarebytesMalwarebytes Anti-MalwareConfiguration" (without quotes)
7. Confirm replacing. Still dont launch Malwarebytes!
8. Now, install newer version setup "Malwarebytes v3.0.4.1269 Setup".
9. Now you can launch the application.
Enjoy..!!
Password to Unzip - mr.samraat

If you find any link broken, plz report it on comments.


Available link for download
Subscribe to:
Posts (Atom)